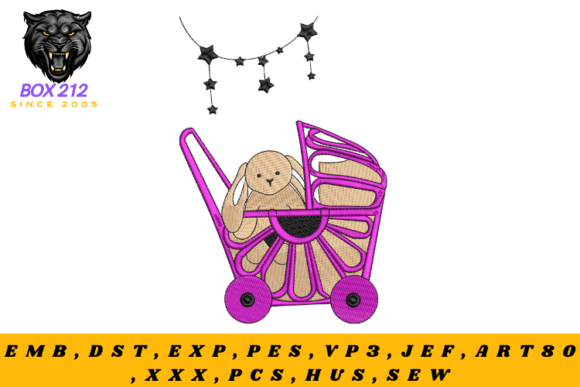
Baby Carriage Embroidery Design
First Impression: Sweet, Simple, and Surprisingly Versatile
When I opened the Baby Carriage Embroidery Design file, I wasn’t expecting much beyond a generic nursery motif—but what landed on my screen was quietly confident. It’s not fussy or overly detailed; it’s a clean, balanced silhouette of a vintage-style baby carriage with gentle curves, subtle wheel definition, and just enough interior suggestion to read as “occupied” without needing a tiny doll or blanket. The design breathes. That matters—especially when you’re stitching on soft cotton onesies or lightweight tea towels where overcrowded motifs collapse into muddy blobs.
A Real-World Test: Stitching It on a Linen Baby Tote
Last week, I used the Baby Carriage Embroidery Design for a custom linen tote bag bound for a baby shower gift. The client wanted something gender-neutral but softly classic—no cartoon animals or loud fonts. I chose a medium-weight cutaway stabilizer, pale mint thread on natural linen, and ran it at 75% density (a quick test stitch confirmed the fill wasn’t too heavy). The result? Crisp satin-stitched edges, smooth fill-stitch wheels, and zero puckering—even along the curved handle arch. Customers notice that quiet polish. It says “handmade with care,” not “thrown together.”
Where This Design Truly Shines
- Custom apparel: Works beautifully on sweatshirt pockets, sleeve accents, and chest placements—especially on midweight knits where dense fill stitches won’t distort the fabric.
- Baby embroidery projects: Ideal for onesies, burp cloths, and crib bumper tags. Its scale reads clearly even at 3.5" wide—no squinting required.
- Embroidered patch potential: With minor cleanup (tightening corner joins, simplifying inner wheel lines), this could become a sew-on or iron-on patch for backpacks or denim jackets.
- Holiday embroidery & gifting: Paired with a simple “Welcome Little One” script in a matching thread palette, it elevates holiday-themed baby blankets or christening towels without feeling seasonal or dated.
- Etsy seller & small shop product: As a digital embroidery file, it’s commercially viable—it’s distinct enough to stand out in search results but timeless enough to sell year after year. No trendy fonts or dated graphics to date it.
Where to Proceed Thoughtfully
This isn’t a one-size-fits-all machine embroidery design—and that’s a good thing. Its charm lies in its intentionality, not its flexibility. Use caution with:
- Small hoop sizes under 4”: The carriage’s proportions start to compress; wheels lose definition, and the handle curve flattens unnaturally. If you’re working with a 3.5" hoop, test first—or consider a simplified version.
- Stretchy or thin fabric: Lightweight jersey or single-layer muslin needs extra stabilization. Without it, the satin-stitched outline can ripple. A tear-away + cutaway combo helps.
- Dark fabric + light thread: The design relies on shape, not contrast-heavy outlines. On charcoal or navy, use a slightly heavier top thread (e.g., 40-weight instead of 60) or add a narrow black underlay to lift the satin stitch.
- Curved surfaces like caps: The carriage’s horizontal orientation doesn’t adapt well to crown curvature. Better suited for front panels or flat bill areas than full cap embroidery.
- Frequent-wash items: While the stitch density feels balanced, always reinforce high-friction zones (like tote bag handles) with an extra run of running stitch around key anchor points.
Design Impact Beyond the Hoop
What makes the Baby Carriage Embroidery Design more than just another clipart-style motif is how it supports your brand voice. For craft businesses, it adds warmth without saccharine overload. For Etsy sellers, it signals attention to detail—customers scroll past busy, cluttered designs but pause for something this considered. And for personalized gifts? It lands with emotional clarity: gentle, hopeful, unhurried. That builds trust—not just in the item, but in you as the maker.
Practical Designer Notes You’ll Actually Use
- Always test on scrap fabric first—especially if pairing with textured weaves (like waffle-knit towels) where fill stitches can sink unevenly.
- Check thread color contrast early. This design doesn’t have built-in shadow layers, so rely on your thread choice to define depth—navy on cream reads stronger than yellow on ivory.
- Review stitch density before scaling. If enlarging beyond 120%, reduce density slightly to avoid thread buildup; if shrinking below 80%, increase density to preserve shape integrity.
- Confirm hoop size compatibility—not just maximum dimensions, but whether the design fits comfortably within your machine’s jump-stitch tolerance.
- Inspect small details at actual stitch size: Zoom in on wheel spokes and handle junctions in your embroidery software. Are they stitched as separate elements or merged? Merged paths are safer for dense fabrics.
- Test in black-and-white mockups before finalizing listings—this reveals how legible the shape remains without color cues.
- Use proper stabilizer for your base fabric, not just your preference. Linen = medium cutaway; terry cloth = heavy cutaway + topping.
- Verify licensing terms before selling finished products or bundling this as part of a digital embroidery bundle. Commercial use isn’t automatic—even for Boys-themed Embroidery files.
Final Thought: A Design That Earns Its Place
The Baby Carriage Embroidery Design won’t shout from a shelf—but it will make someone smile while folding baby clothes, reach for a second look on a boutique apron, or become the quiet signature of your handmade product line. It’s proof that restraint, proportion, and thoughtful execution matter more than complexity. In a market flooded with overdesigned digital embroidery files, this one earns its keep—not because it’s flashy, but because it works, reliably, gracefully, and with quiet confidence.